Sooner or later something other than you needs to talk to your GitHub account: a backup plugin, a script, a CI job, or plain git push over HTTPS. None of them can use your password — GitHub stopped accepting passwords for that in 2021 — and none of them can use an SSH key if they speak to GitHub's API rather than to Git. What they need is a personal access token.
This walks through making one, field by field. The running example is Zotero GitHub Sync, the plugin that backs a Zotero library up to a repository — but nothing here is specific to it. Swap in whatever app you're setting up; only the last step changes.
If git and GitHub themselves are new to you, read Git dan Github, untuk Menyimpan Files dan historynya first — this page assumes you know what a repository is.
Two kinds exist, and you want the fine-grained one, not the classic: it can be locked to exactly one repository, so if it leaks it reaches one repository and nothing else you own.
1. Make the repository first
A fine-grained token is scoped to a repository, so the repository has to exist before you can point a token at it. Create one, mark it Private unless you mean otherwise, and — if an app is going to fill it — leave it completely empty. No README, no .gitignore. An app that makes the first commit itself has nothing to merge with.
2. Open the fine-grained token page
Go straight to github.com/settings/personal-access-tokens/new.
Or navigate there by hand, which is four levels deep and easy to lose: click your avatar → Settings → scroll to the bottom of the left sidebar → Developer settings → Personal access tokens → Fine-grained tokens → Generate new token.
3. Fill in four things and ignore the rest
Generate new token — fine-grained
Token namezotero-github-sync
Expirationyour call — note the date
Resource owneryour account
All repositoriesleave it
Only select repositorieszotero-library
Illustration, not a screenshot — GitHub moves its layout around, but these are the fields that matter.
- Token name — anything you'll recognise later.
zotero-github-sync does the job. It's a label for you, not a setting.
- Expiration — your call. A token that never expires is one less thing to redo; a token that expires is one less thing to worry about if it leaks. Whatever you pick, note the date: when it expires, syncs start failing with 401 and you make a new one.
- Repository access → Only select repositories → pick the repository from step 1. Not "All repositories". This is the whole reason to use a fine-grained token: if this token ever leaks, it reaches one repo and nothing else you own.
- Permissions → Repository permissions → Contents → Read and write. That's the only one you need. Metadata: Read-only gets added automatically — leave it. Everything else stays at No access.
Permissions → Repository permissions
ContentsRead and write
MetadataRead-only — added for you
Administrationonly if the plugin should create the repo
Everything elseNo access
One permission does the work. There is no Git LFS checkbox to look for — Contents covers it.
People ask about Git LFS here, because the plugin sends large files through it. There's no LFS permission to tick: Contents already covers it.
One exception. If you'd rather have the plugin create the repository for you instead of making it yourself, add Administration: Read and write too. If you made the repo in step 1, skip it — fewer permissions is the better habit.
4. Generate it, and copy it immediately
Click Generate token. GitHub shows you a string starting with github_pat_ — this is the only time you will ever see it. Copy it now. If you lose it, you don't recover it; you delete that token and make another one.
Don't paste it into a chat, an email, a notes app, or a config file you might commit. It goes into exactly one place: Zotero.
5. Give it to the app
Wherever the app asks for it. In our example — Zotero: Edit → Settings → GitHub Sync (on macOS, Zotero → Settings), paste, Save token. Worth checking for any app you trust with one: a good one stores the token in the system keychain or its own password store rather than a plain-text config file. This one uses Zotero's password manager, the same place Zotero keeps its own API key.
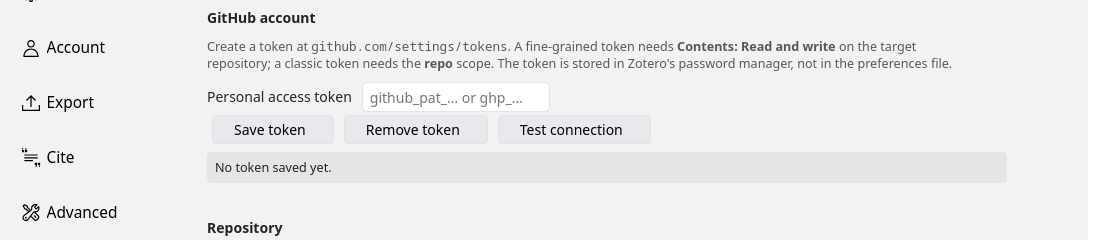
Fill in the owner (your GitHub username) and the repository name, then hit Test connection. What you want to see is something like "Write access to yourname/your-repo (private)". If the app offers a test like this, use it before trusting it with anything — it separates three failures that otherwise look identical.
Using the same token from the terminal
A token isn't only for apps. When you git push to a private repository over HTTPS, git asks for a username and a password — and the token is the password. Paste it there; your account password will be refused.
$ git push
Username for 'https://github.com': yourname
Password for 'https://yourname@github.com': <paste the token>
Typing it on every push gets old, so let git remember it:
$ git config --global credential.helper store     # plain file in your home directory
$ git config --global credential.helper libsecret  # Linux keyring, if available
$ git config --global credential.helper osxkeychain # macOS
The first one writes the token to ~/.git-credentials in clear text, which is fine on a machine only you use and a bad idea on a shared one. If you mostly work in a terminal and don't need the API, an SSH key avoids all of this — it just can't serve an app that talks to the API.
When it says no
| 401 — rejected the token | Expired, mistyped, or revoked. Make a new one and save it again. |
| 403 — denied the request | The token exists but lacks Contents: Read and write on that repository. Edit the token, don't remake it. |
| 404 / "not visible to this token" | The repository wasn't selected under Only select repositories, or the owner/name is misspelled. A fine-grained token genuinely cannot see repositories it wasn't granted. |
| Repository not created | You asked the plugin to create it without giving it Administration: Read and write. |
| 507 — quota exceeded | Not GitHub's storage — Git LFS storage. A free account gets 10 GiB of LFS storage and 10 GiB of bandwidth a month, and only files over the threshold use it. |
Housekeeping worth doing once
Tokens are listed at Settings → Developer settings → Fine-grained tokens. Three habits that cost nothing:
- One token per purpose. If you later want a token for something else, make a second one rather than widening this one. Revoking one then doesn't break the other.
- Revoke instead of editing when a token might have leaked. Deleting it takes effect immediately.
- Check the expiry date when a sync suddenly starts failing with 401 and nothing else changed. That's almost always what happened.
That's the whole thing, and it's the same five minutes whatever you're connecting. If you came here for the Zotero plugin, the story is in the main post and the newest .xpi downloads from here. If you came here for something else entirely — a CI job, a script, a different app — everything above step 5 applies unchanged.
This article and the plugin were helped by Claude and Gemini.
Cepat atau lambat ada sesuatu selain kamu yang perlu ngomong ke akun GitHub kamu: plugin backup, sebuah script, job CI, atau sekadar git push lewat HTTPS. Nggak satu pun bisa pakai password akun — GitHub berhenti menerima password untuk itu sejak 2021 — dan nggak bisa pakai SSH key kalau yang diajak bicara itu API-nya GitHub, bukan Git-nya. Yang dibutuhkan: personal access token.
Tulisan ini memandu bikin token itu, kolom demi kolom. Contoh kasusnya Zotero GitHub Sync, plugin yang mencadangkan library Zotero ke repo — tapi nggak ada yang khusus Zotero di sini. Ganti saja dengan aplikasi apa pun yang mau kamu pasang; cuma langkah terakhir yang beda.
Kalau git dan GitHub-nya sendiri masih asing, baca dulu Git dan Github, untuk Menyimpan Files dan historynya — halaman ini menganggap kamu sudah tahu repository itu apa.
Tokennya ada dua jenis, dan yang kamu mau itu fine-grained, bukan yang classic: dia bisa dikunci ke satu repo saja, jadi kalau bocor pun jangkauannya cuma satu repo, bukan semua milik kamu.
1. Bikin repo-nya duluan
Fine-grained token di-scope ke satu repository, jadi repo-nya harus ada dulu sebelum bisa ditunjuk. Bikin satu, set Private kecuali kamu memang mau sebaliknya, dan — kalau nanti diisi oleh sebuah aplikasi — biarkan kosong melompong. Nggak usah README, nggak usah .gitignore. Aplikasi yang bikin commit pertamanya sendiri jadi nggak perlu repot menggabungkan apa-apa.
2. Buka halaman fine-grained token
Langsung aja ke github.com/settings/personal-access-tokens/new.
Atau kalau mau jalan manual — empat tingkat dalamnya, gampang nyasar: klik avatar kamu → Settings → scroll ke paling bawah sidebar kiri → Developer settings → Personal access tokens → Fine-grained tokens → Generate new token.
3. Isi empat hal, sisanya abaikan
Generate new token — fine-grained
Token namezotero-github-sync
Expirationbebas — catat tanggalnya
Resource ownerakun kamu
All repositoriesjangan
Only select repositorieszotero-library
Ilustrasi, bukan screenshot — tata letak GitHub suka berubah, tapi kolom-kolom inilah yang penting.
- Token name — bebas, asal nanti kamu kenali sendiri.
zotero-github-sync sudah cukup. Ini label buat kamu, bukan setting.
- Expiration — terserah. Token tanpa kedaluwarsa artinya satu hal yang nggak perlu diulang; token yang kedaluwarsa artinya satu hal yang nggak perlu dikhawatirkan kalau bocor. Apa pun pilihannya, catat tanggalnya: pas expired, sync-nya mulai gagal dengan 401 dan kamu tinggal bikin baru.
- Repository access → Only select repositories → pilih repo dari langkah 1. Jangan "All repositories". Ini justru alasan utama pakai fine-grained token: kalau token ini bocor, dia cuma nyampe ke satu repo, bukan ke semua milik kamu.
- Permissions → Repository permissions → Contents → Read and write. Cuma itu yang perlu. Metadata: Read-only nanti nempel otomatis — biarin aja. Sisanya biarkan No access.
Permissions → Repository permissions
ContentsRead and write
MetadataRead-only — otomatis nempel
Administrationcuma kalau plugin yang bikin repo
SisanyaNo access
Satu izin saja yang bekerja. Nggak usah nyari checkbox Git LFS — Contents sudah mencakupnya.
Biasanya orang nyari-nyari izin Git LFS di sini, soalnya file besar dikirim lewat LFS. Nggak ada checkbox LFS: Contents sudah sekalian mencakup itu.
Satu pengecualian. Kalau kamu lebih milih plugin-nya yang membuatkan repo-nya ketimbang bikin sendiri, tambahkan Administration: Read and write. Kalau repo-nya sudah kamu bikin di langkah 1, lewati saja — makin sedikit izin, makin bagus kebiasaannya.
4. Generate, lalu langsung copy
Klik Generate token. GitHub bakal nampilin string yang diawali github_pat_ — dan cuma sekali itu kamu bisa lihat. Copy sekarang juga. Kalau kelewat, nggak bisa diambil lagi; token itu dihapus, bikin yang baru.
Jangan tempel token itu ke chat, email, aplikasi catatan, atau file config yang mungkin ke-commit. Tujuannya cuma satu: Zotero.
5. Kasih ke aplikasinya
Di mana pun aplikasinya minta. Di contoh kita — Zotero: Edit → Settings → GitHub Sync (di macOS, Zotero → Settings), tempel, Save token. Satu hal yang layak dicek untuk aplikasi apa pun yang kamu titipi token: yang bagus menyimpannya di keychain sistem atau password store-nya sendiri, bukan di file config teks biasa. Yang ini memakai password manager Zotero, tempat yang sama dengan API key Zotero sendiri.
Isi owner (username GitHub kamu) dan nama repository-nya, terus pencet Test connection. Yang diharapkan muncul kira-kira "Write access to namakamu/repo-kamu (private)". Kalau aplikasinya menyediakan tes semacam ini, pakai dulu sebelum mempercayakan apa pun — dia memisahkan tiga kegagalan yang kalau nggak dicek kelihatan sama persis.
Token yang sama, dipakai dari terminal
Token bukan cuma buat aplikasi. Pas kamu git push ke repo privat lewat HTTPS, git bakal nanya username dan password — dan token itulah password-nya. Tempel di situ; password akun kamu bakal ditolak.
$ git push
Username for 'https://github.com': namakamu
Password for 'https://namakamu@github.com': <tempel token-nya>
Ngetik terus tiap push itu capek, jadi suruh git mengingatnya:
$ git config --global credential.helper store     # file biasa di home directory
$ git config --global credential.helper libsecret  # keyring Linux, kalau ada
$ git config --global credential.helper osxkeychain # macOS
Yang pertama menulis token ke ~/.git-credentials dalam bentuk teks biasa — aman-aman saja di komputer yang cuma kamu pakai, ide buruk di komputer bersama. Kalau kamu lebih sering kerja di terminal dan nggak butuh API, SSH key membebaskanmu dari semua ini — cuma memang nggak bisa dipakai aplikasi yang ngomong ke API.
Kalau ditolak
| 401 — token ditolak | Kedaluwarsa, salah ketik, atau sudah di-revoke. Bikin baru, simpan lagi. |
| 403 — request ditolak | Token-nya ada tapi izin Contents: Read and write di repo itu kurang. Edit token-nya, nggak perlu bikin ulang. |
| 404 / "nggak kelihatan sama token ini" | Repo-nya nggak dipilih di Only select repositories, atau owner/nama-nya salah ketik. Fine-grained token memang benar-benar nggak bisa melihat repo yang nggak diberikan ke dia. |
| Repo nggak kebikin | Kamu minta plugin-nya bikin repo tapi nggak ngasih Administration: Read and write. |
| 507 — kuota habis | Bukan storage GitHub — ini storage Git LFS. Akun gratis dapat 10 GiB storage LFS dan 10 GiB bandwidth per bulan, dan cuma file di atas threshold yang memakainya. |
Beres-beres yang cukup dilakukan sekali
Daftar token ada di Settings → Developer settings → Fine-grained tokens. Tiga kebiasaan yang nggak makan ongkos:
- Satu token untuk satu keperluan. Kalau nanti butuh token buat hal lain, bikin yang kedua, jangan melebarkan yang ini. Jadi mencabut satu nggak merusak yang lain.
- Revoke, jangan diedit, kalau ada kemungkinan token-nya bocor. Menghapusnya langsung berlaku saat itu juga.
- Cek tanggal expired kalau tiba-tiba sync gagal 401 padahal nggak ada yang diubah. Hampir selalu itu penyebabnya.
Segitu aja, dan lima menitnya sama saja mau nyambungin apa pun. Kalau kamu ke sini gara-gara plugin Zotero, ceritanya ada di post utamanya dan .xpi terbarunya bisa diunduh di sini. Kalau kamu ke sini buat hal lain — job CI, sebuah script, aplikasi yang beda — semua langkah sebelum nomor 5 berlaku sama persis.
Artikel dan plugin ini dibantu oleh Claude dan Gemini.